It has been an interesting and nerdy week, to say the least. The device arrived earlier this week, and it has been a steep learning curve to get everything sorted. Now, everything is working as intended, and this blog post summarizes what I have accomplished so far.
Mounting the OVMS Module in the car
As you already know, I own a VW e-UP! The documentation recommends placing the module next to the hood lever, which is exactly what I did.
Disclaimer: I am not a mechanic, and I approach cars the way most people approach computers – they should simply work. I possess no knowledge about them and have little interest in learning. 😊 With that said, I embarked on my endeavor to mount the module in a neat and orderly fashion. My first challenge was removing the hood lever. Despite my efforts, it would not budge, so I ended up bending the entire plastic cover and maneuvering it out – with the hood lever still attached.

Once everything was mounted, I attempted to replace the cover, but it was nearly impossible without breaking it. I realized there must be a way to remove the lever. Upon inspecting it from behind and using a screwdriver to pry, a lid suddenly popped open! It turns out that one must remove a plastic lock on the back to detach the lever, and once that was done, it came off effortlessly.


With everything in place, it was just a matter of reassembling everything. I decided to add some extra styrofoam on top of the cover to prevent noise when driving on bumpy roads, because who likes a noisy cabin?
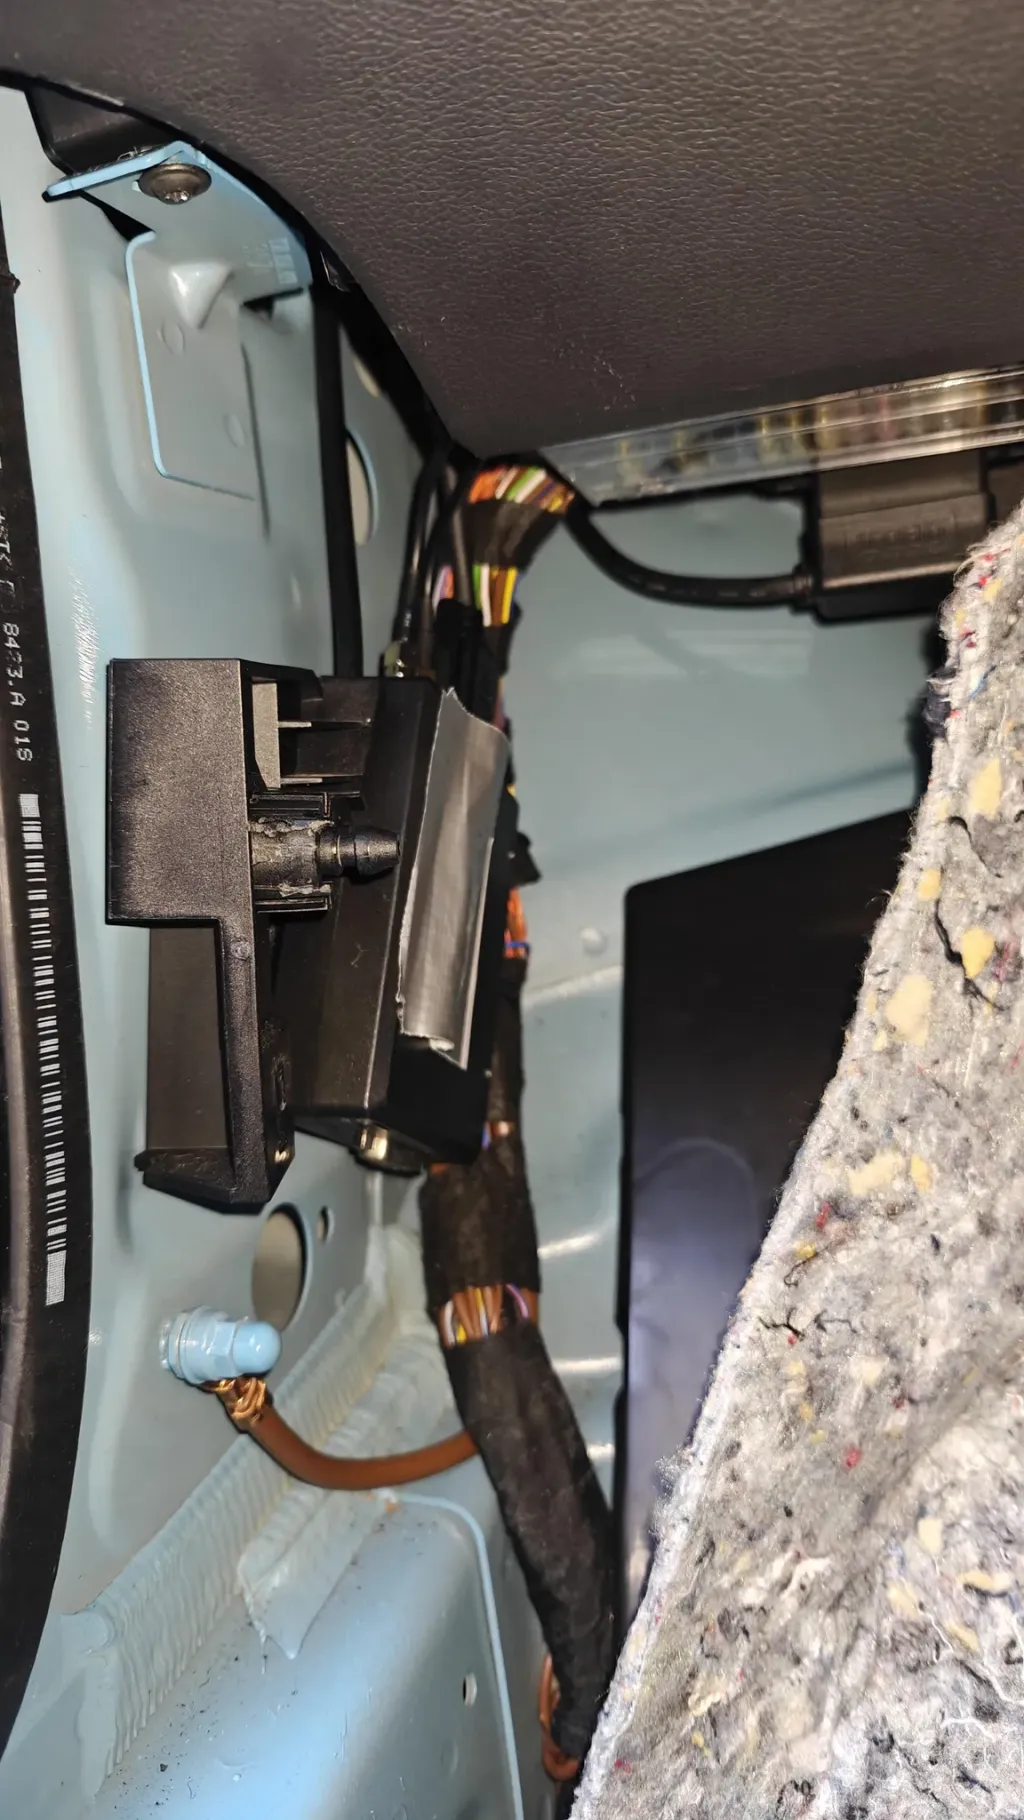
I am quite satisfied with the result, although I acknowledge it needs cleaning…

MQTT Broker
As you may recall from my previous post, I began by setting up the V2 server. This proved to be entirely unnecessary, as it is perfectly acceptable to run OVMS over MQTT – at least for my personal needs. Instead, I installed an EMQX MQTT server in a Docker container. The process was remarkably smooth, and I am quite fond of the GUI (even though I do not use it). It feels responsive and capable, and if you connect their client to it (it does not have to be their client, but it is a good option), you can experiment with different topics and ensure everything is functioning correctly before integrating it into your HAOS.
Initially, I will use dexters-web to verify that everything is working. I will later remove it once I have everything I need in MQTT. I do not really need the app since I send everything to my HAOS anyway.
Deploying
While researching, I discovered that most people use the Eclipse MQTT broker. This is also the default broker installed in HAOS, if I am not mistaken. However, I wanted an alternative and found a guide on how to set it up. Following the guide, I was up and running in approximately 15 minutes.
Instead of using docker run I opted to set up a rootless docker compose. This is the docker-compose.yaml:
services:
emqx:
image: emqx:latest
container_name: emqx
environment:
- "EMQX_MQTT__UPGRADE_QOS=true"
- "EMQX_MQTT__MQUEUE_STORE_QOS0=true"
- "EMQX_MQTT__SESSION_EXPIRY_INTERVAL=960h"
- "EMQX_MQTT__MAX_MQUEUE_LEN=10000000"
- "EMQX_NODE__COOKIE=sc_emqx"
- "EMQX_ALLOW_ANONYMOUS=false"
- "EMQX_LISTENERS__SSL__DEFAULT__BIND=8883"
- "EMQX_LISTENERS__SSL__DEFAULT__SSL_OPTIONS__KEYFILE=/opt/emqx/etc/certs/privkey.pem"
- "EMQX_LISTENERS__SSL__DEFAULT__SSL_OPTIONS__CERTFILE=/opt/emqx/etc/certs/fullchain.pem"
- "EMQX_LISTENERS__SSL__DEFAULT__SSL_OPTIONS__CACERTFILE=/opt/emqx/etc/certs/cacert.pem"
- "EMQX_LISTENERS__WSS__DEFAULT__SSL_OPTIONS__KEYFILE=/opt/emqx/etc/certs/privkey.pem"
- "EMQX_LISTENERS__WSS__DEFAULT__SSL_OPTIONS__CERTFILE=/opt/emqx/etc/certs/fullchain.pem"
- "EMQX_LISTENERS__WSS__DEFAULT__SSL_OPTIONS__CACERTFILE=/opt/emqx/etc/certs/cacert.pem"
- "EMQX_DASHBOARD__LISTENERS__HTTPS__ENABLE=true"
- "EMQX_DASHBOARD__LISTENERS__HTTPS__BIND=18084"
- "EMQX_DASHBOARD__LISTENERS__HTTPS__SSL_OPTIONS__KEYFILE=/opt/emqx/etc/certs/privkey.pem"
- "EMQX_DASHBOARD__LISTENERS__HTTPS__SSL_OPTIONS__CERTFILE=/opt/emqx/etc/certs/fullchain.pem"
- "EMQX_DASHBOARD__LISTENERS__HTTPS__SSL_OPTIONS__CACERTFILE=/opt/emqx/etc/certs/cacert.pem"
- TZ=Europe/Stockholm
restart: unless-stopped
deploy:
resources:
limits:
memory: 2g
healthcheck:
test: ["CMD", "/opt/emqx/bin/emqx", "ctl", "status"]
interval: 5s
timeout: 25s
retries: 5
ports:
- 1883:1883
- 8083:8083
- 8084:8084
- 8883:8883
- 18084:18084
volumes:
- ./data/mqtt-broker_fullchain.pem:/opt/emqx/etc/certs/fullchain.pem:ro
- ./data/mqtt-broker_privkey.pem:/opt/emqx/etc/certs/privkey.pem:ro
- ./data/mqtt-broker_cacert.pem:/opt/emqx/etc/certs/cacert.pem:ro
- ./logs:/opt/emqx/log
- ./data:/opt/emqx/data
networks:
mqtt_network:
name: mqtt_external_net
external: true
I run everything as the ovms user and the first script here are used to reset the EMQX docker. I utilized this during testing, and it saved me some time with each reset.
!/bin/bash

# emqx_deploy.sh

# Go to correct dir

cd /home/ovms/emqx-mqtt-broker/

# Shutdown old docker

su ovms -c "docker compose down"
su ovms -c "docker system prune -af"

# Clean old dirs

rm -rf /home/ovms/emqx-mqtt-broker/data
rm -rf /home/ovms/emqx-mqtt-broker/logs

# Prep persistent data and log dir

mkdir -p /home/ovms/emqx-mqtt-broker/data
mkdir -p /home/ovms/emqx-mqtt-broker/logs

# Permissions

chmod 777 /home/ovms/emqx-mqtt-broker/data/
chmod 777 /home/ovms/emqx-mqtt-broker/logs/
chown ovms:ovms /home/ovms/emqx-mqtt-broker/ -R

# Copy new certs to the correct places

bash -x /root/scripts/gen_new_tls.sh

# Start

su ovms -c "docker compose up -d"
su ovms -c "docker exec -it emqx emqx ping"
I use TLS from my NGINX reverse proxy, hence the /mnt/... instead of /etc/... path in the below scripts. Similar to the OVMS server, you need to copy the actual script into the data directory, so I extended the scripts for the V2 server to cover the EMQX docker as well. 100999 here are the UID for the rootless user.
#!/bin/bash

# gen_new_tls.sh

TODAY=$(date +'%Y-%m-%d')

# OVMS
SUBDOMAIN=ovms-whatever
if [ "$(date -r /mnt/letsencrypt/live/${SUBDOMAIN}.techandme.se/cert.pem -u +'%Y-%m-%d')" = "$TODAY" ]
then
    OVMS_CONF_DIR=/home/ovms/Open-Vehicle-Server/v3/server/conf
    cat /mnt/letsencrypt/live/"$SUBDOMAIN".techandme.se/privkey.pem /mnt/letsencrypt/live/"$SUBDOMAIN".techandme.se/fullchain.pem > "$OVMS_CONF_DIR"/ovms_server.pem
    chmod 0600 "$OVMS_CONF_DIR"/ovms_server.pem
    chown ovms "$OVMS_CONF_DIR"/ovms_server.pem

fi

#EMQX
SUBDOMAIN=mqtt-whatever
if [ "$(date -r /mnt/letsencrypt/live/${SUBDOMAIN}.techandme.se/cert.pem -u +'%Y-%m-%d')" = "$TODAY" ]
then
    EMQX_DATA_DIR=/home/ovms/emqx-mqtt-broker/data
    cat /mnt/letsencrypt/live/"$SUBDOMAIN".techandme.se/privkey.pem > "$EMQX_DATA_DIR"/"$SUBDOMAIN"_privkey.pem
    cat /mnt/letsencrypt/live/"$SUBDOMAIN".techandme.se/fullchain.pem > "$EMQX_DATA_DIR"/"$SUBDOMAIN"_fullchain.pem
    cat /mnt/letsencrypt/live/"$SUBDOMAIN".techandme.se/chain.pem > "$EMQX_DATA_DIR"/"$SUBDOMAIN"_cacert.pem
    chmod 0600 "$EMQX_DATA_DIR"/"$SUBDOMAIN"_privkey.pem
    chmod 0600 "$EMQX_DATA_DIR"/"$SUBDOMAIN"_fullchain.pem
    chmod 0600 "$EMQX_DATA_DIR"/"$SUBDOMAIN"_cacert.pem
    chown 100999:100999 "$EMQX_DATA_DIR"/"$SUBDOMAIN"_privkey.pem
    chown 100999:100999 "$EMQX_DATA_DIR"/"$SUBDOMAIN"_fullchain.pem
    chown 100999:100999 "$EMQX_DATA_DIR"/"$SUBDOMAIN"_cacert.pem

    # Reset cert in EMQX docker
    cd /home/ovms/emqx-mqtt-broker
    su ovms -c "docker exec -it emqx emqx ctl pem_cache clean all"
fi
A small piece of advice is to place the GUI behind a country block in your firewall or only allow access from your home IP. For me, it is unnecessary to allow the entire world to access it.
Cronjob for cert generation
Since the Let’s Encrypt certificate renews regularly, it is advisable to place gen_new_tls.sh in a cronjob. As you can see, I have already included some logic in the script to check if the certificate was generated “today”. This means you can run gen_new_tls.sh daily at 23:59 to copy the newly generated script into the EMQX docker container. It will only execute the copy if the certificate is from today, so it can be run every day without causing any issues.
Home Assistant OS (HAOS)
In my case, I use the standard MQTT broker in HAOS to communicate with my lights, outlets, and other devices via Zigbee2MQTT. Everything operates locally on a highly secure VLAN that I do not wish to expose to the outside world. This is why I configured OVMS to communicate with an external MQTT broker, and I intend to keep it that way.
During my research, I encountered numerous forum posts from individuals attempting to run two different MQTT brokers in HAOS. The most common advice was to set up an MQTT Bridge. I spent several hours trying to configure my current HAOS broker as a bridge but ultimately failed. I managed to connect it to my Zigbee2MQTT, but it refused to connect to my external broker. Maybe I was too tired, I eventually gave up at 3:27 AM.
Node-RED
For most of my automations involving my cars and home battery, I already use Node-RED. I wondered if it was possible to set up a separate node that connected to my external MQTT broker, thereby tricking HAOS into running two brokers simultaneously. You know what? It worked!
However, the next challenge was how to get the values from the MQTT broker in Node-RED to become sensors in HAOS. After further research, I found a custom integration that does exactly that. I felt a sense of accomplishment – “wow, I’m almost done!” The next step was to determine which topics I needed to smart charge my car again and regain the functionality I lost when VW decided to use outdated technology in new cars (rendering internet connectivity useless). Using the EMQX Client app, I connected to my external broker and began subscribing to all topics with wildcards. I ended up using these subscriptions, though there may be a better way.
ovms/username/vehicleID/metric/+
ovms/username/vehicleID//metric/+/+
ovms/username/vehicleID//metric/+/+/+
ovms/username/vehicleID//metric/+/+/+/+
ovms/username/vehicleID//metric/+/+/+/+/+
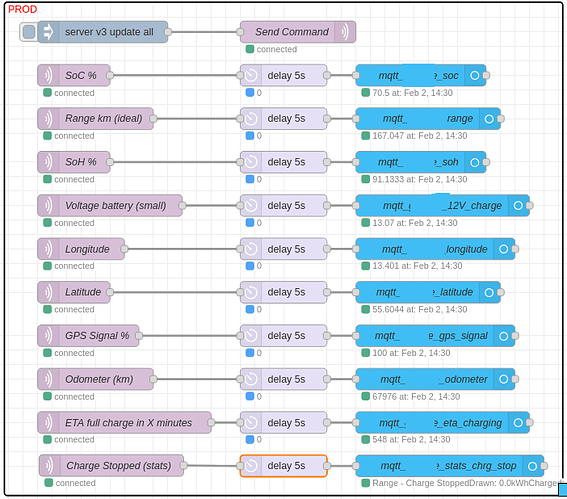
I then went to the V2 server and issued the command server v3 update all to ensure everything was updated and sent to the MQTT broker. With the subscriptions active, I could see everything sent to the broker and select what I wanted to use in HAOS.
Another useful command on the V2 server is metrics list, which lists all metrics and their values
Putting it all togehter
With everything I needed, I began building sensors in Node-RED and replaced the old ones where necessary. During the setup, I noticed that the sensor occasionally failed to work. No msg.payload was sent, resulting in home-assistant.error.error, and it became unavailable in the HAOS GUI

To resolve this, I accessed the mobile app for the V2 server and manually sent server v3 update all. This command would resend all metrics to the MQTT broker in Node-RED, resolving the issue. But what if this happened in the middle of the night? A potential outcome could be a car that had not charged as expected. Could I fix it? At the very least, I could try.
After consulting the OVMS developers (thank you!), I learned that commands could be sent directly to the OVMS Module. This meant I could send the server v3 update all command directly from Node-RED and add a condition stating that if sensor = null, then send the command. That was my plan. However, the problem was that I received no output from the sensor when it failed; it only sent msg.payload when the command was successful. After several hours of testing back and forth, hitting the Deploy button in Node-RED, I noticed that the MQTT subscribe node turned red, yellow, and then connected. This indicated that it restarted with each deployment, and if the restart was not completed when the sensor was available, it would fail. A race condition was identified!
The obvious solution emerged: add a delay between the MQTT subscription node and the sensor. This way, it would not matter if the HAOS sensor was ready before the MQTT subscription node was operational, as the MQTT subscription node would send the command when it became active. This approach worked perfectly:
Location tracker
The OVMS module comes with a GPS, and to let HAOS know the location, you need to add a tracker template. Simply put, this is it:
alias: VehicleID Position
description: ""
triggers:
  - trigger: state
    entity_id:
      - sensor.mqtt_VehicleID_longitude
      - sensor.mqtt_VehicleID_latitude
conditions: []
actions:
  - action: device_tracker.see
    data:
      gps:
        - "{{ states('sensor.mqtt_VehicleID_latitude') }}"
        - "{{ states('sensor.mqtt_VehicleID_longitude') }}"
      dev_id: GGK97E
      gps_accuracy:
        - "{{ states('sensor.mqtt_VehicleID_gps_signal') }}"
mode: single
Postlude
Now, everything is functioning as intended, and tonight I am back to smart charging my car based on tariffs and all the other automations in my home. I believe OVMS will be my next significant contributor project, similar to how Nextcloud once was. Today, I met someone on the Home Assistant forum who plans to develop an OVMS MQTT integration for HASS.
I believe OVMS is fantastic, and I foresee a significant need for people to obtain a replacement now that 3G is being phased out to make way for 4G/5G. I am still baffled by the decision of car manufacturers to incorporate outdated technology in new cars (mine is a 2021 model) – but with OVMS, there is no need to worry. It just needs to become a bit easier for the average person to purchase it off the shelf and make it work with HAOS or another automation tool. That is what I intend to contribute to!