
Last week we came to think of that back in the days we where gaming, we had stuff like Ventrilo and Teamspeak to voice chat with each other. That made us want to give it a shot and try out how it ran on Ubuntu. It worked quite well, hence the idea to just make a virtual machine out of it. Now we can expand our VM base even more! Per default, the Teamspeak 3 server creates a virtual voice server on port 9987 (UDP). The ServerQuery is listening on port 10011 (TCP) and file transfers will use port 30033 (TCP).
Here you go: Teamspeak VM Ubuntu 16.04 LTS
Last updated: 2018-02-25
Now with Webmin and Teamspeak Server 64-bit 3.1.0
INSTRUCTIONS
- Import the OVA into VMware (PC & Linux users) or VirtualBox (Mac users)
- Login using username: teamspeak password: teamspeak
- Run the setup script by typing the sudo password:
[sudo] password for teamspeak: teamspeak
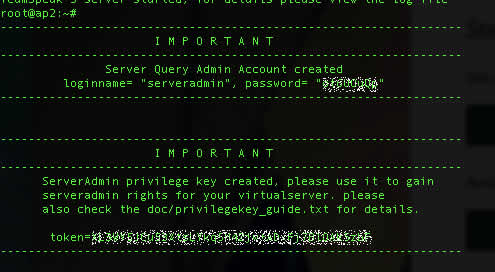
- Wait for the script to finish, make sure to write down the: server admin, password and the security token when prompted.
- To access Webmin go to:
https://your-internal-ip-adress:10000 (https://192.168.1.141:10000 or similar)
- Enjoy your Teamspeak installation!
- Download the client here.
- In your router forward ports 9987 – UDP, 10011 – TCP, 30033 – TCP to your internal LAN IP that was shown to you during the installation.
- Use your WAN IP / Domain name to connect to the server, and also don’t forget to enter the username and password shown to you during the installation.
- Finally enter the security token shown to you during the installation.
- Chat all you can!
Please post any issues here.
Non-virtual machine install
- Get and make the script executable and run it
:~$ sudo wget https://raw.githubusercontent.com/ezraholm50/Teamspeak-VM/master/initial.sh -P /tmp
:~$ sudo bash /tmp/initial.sh
2. Log out of your terminal and log back in or just reboot.