Note: Take a look at this new guide were we set up a reverse proxy with Nginx.
If you like to have several ownCloud instances, or simply just want to use a proxy in front of ownCloud, then Pound Proxy is a good alternative. It’s lightweight, open source and can act both as a load balancer and a reverse proxy with a few options.
Our use case
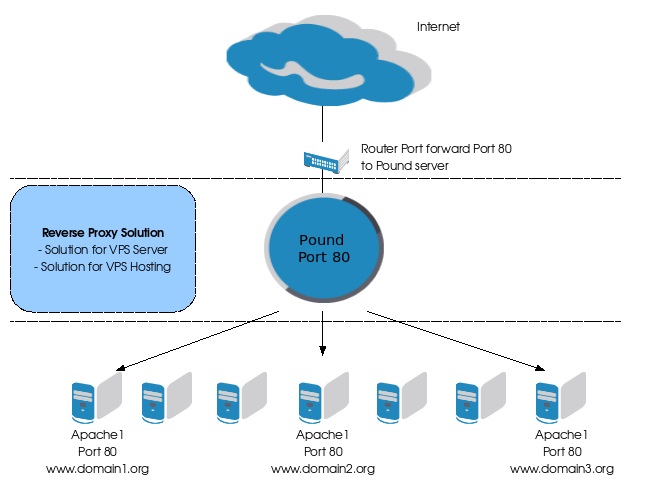
Our own use case is that we host several ownCloud instances on the same server, public IP address and port – in this case port 80. Of course – we could have set up several ownCloud instances on the same VM and system, but we want to separate them for various reasons. Unfortunately we haven’t found out yet how to mix port 443 and port 80, but we will keep on investigating how to solve that issue. If someone has the answer to that, we would really like to know.
This guide
In this guide we will setup several different ownCloud instances and websites, hosted on different internal IPs on port 80 – though port 443 is recommended. The first thing we have to do is to install Pound Proxy on our system and configure it with our preferences. Later we will change the virtual hosts in Apache accordingly. The guide is based on Ubuntu Server 14.04.3
-
Install pound proxy
$~: sudo apt-get install pound
-
Backup the config file
It’s nice to always have a backup of the original settings so you can revert if it gets too confusing.
sudo cp /etc/pound/pound.cfg /etc/pound/pound.cfg.orig
-
Edit the config file
sudo nano /etc/pound/pound.cfg
As this is based on port 80, we will only use that in this tutorial. Here is an example setup.
# Pound Proxy (VM 1)

ListenHTTP
         Address 192.168.1.200
         Port 80
         xHTTP 3

# example.com (VM 2)

Service
         HeadRequire "Host: example.com.*"
         BackEnd
         Address 192.168.1.150
         Port 80
         End
Session
         Type IP
         TTL 60000
         End
 End

# website2.com (VM 3)

Service
         HeadRequire "Host: website2.com.*"
         BackEnd
         Address 192.168.1.160
         Port 80
         End
Session
         Type IP
         TTL 60000
         End
 End

# owncloud.website2.se (VM 3)

Service
         HeadRequire "Host: *.owncloud.website2.se.*"
         BackEnd
         Address 192.168.1.160
         Port 80
         End
Session
         Type IP
         TTL 60000
         End
 End

# owncloud.website3.com (VM 4)

Service
         HeadRequire "Host: *.owncloud.website3.com*"
         BackEnd
         Address 192.168.1.173
         Port 80
         End
Session
         Type IP
         TTL 60000
         End
      End
End
As you may have noticed, 192.168.1.200 is the proxy which is installed on a seperate VM and its only purpose is to handle the traffic to the other VMs on the host server. All the different IP addresses are different VMs and with this setup we can handle several VMs on the same port, in this case port 80. This is good because the gateway/router can only handle one incoming port with the same number. What Pound Proxy does is to deliver the different content on the same incoming port to the same port but on different internal IP addresses. That would be impossible without the Reverse Proxy that Pound delivers. This is how it works:
The xHTTP setting is crucial to get WebDAV working on your system. Without it ownCloud fails to connect through WebDAV and you can’t use the clients or CalDAV / CarDDAV. It took us a while to figure this out, until we found this thread on the ownCloud forum. You know, sometimes the most simple solutions are the hardest to find. You can find even more info in the Pound manpages as well.
-
Change settings in router / gateway
If you had set up your router to serve the different ports to the different IPs before, you can now delete those settings. Because the only port you have to forward with Pound is the port to the IP were you will host pound.
So for example, if you want Pound to listen to port 80, you just forward port 80 to the IP where Pound is located. All the other settings are made in the pound.cfg file above. —^
-
Configure Apache Virtual hosts
In our case we used IP based virtual Hosts in Apache to be sure that the traffic went through the correct VMs. We tried to use the usual config <VirtualHost *:80> statement as well, and it worked but we just wanted to be absolutely sure. This is how our config looks like on VM 3.
<VirtualHost 192.168.1.160:80> ServerName www.website2.se ServerAlias website2.se DocumentRoot "/var/www/website2.se" <Directory /var/www/website2.se> Require all granted </Directory> ErrorLog ${APACHE_LOG_DIR}/error.log CustomLog ${APACHE_LOG_DIR}/access.log combined </VirtualHost> #---------------------------------------------------------# <VirtualHost 192.168.1.160:80> ServerName owncloud.website2.se DocumentRoot /var/www/owncloud <Directory /var/www/owncloud> Require all granted AllowOverride All </Directory> ErrorLog ${APACHE_LOG_DIR}/error.log CustomLog ${APACHE_LOG_DIR}/access.log combined </VirtualHost> -
Now you should be good to go
If you experience any issues with this config, please contact us.

Serving SSL on port 443
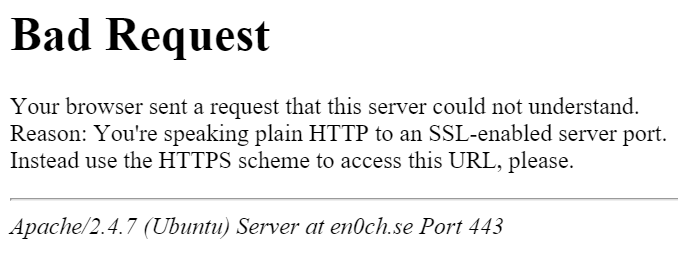
We have tested to mix the ListenHTTP (port 80) with the ListenHTTPS (port 443) directive in the same pound.cfg file, and we succeeded to set it up so that it worked with port 80 Backends, but we still haven’t found a way to serve port 443 on both the Pound Proxy and the Backend. If you figure this out, please contact us so we can publish it in this guide, and help others that is looking for answers on this matter.
This is the error we get when we used port 443 both ways:
Example config
We also enabled “SetEnv HTTPS on” in the Apache virtual host on the backend server.
# Pound Proxy (VM 1)

ListenHTTPS
           Address 192.168.1.200
           Port 443
           AddHeader "X-Forwarded-Proto: https"
           HeadRemove "X-Forwarded-Proto"
           HeadRemove "X-Forwarded-For"
           xHTTP 3
           Cert "/etc/ssl/certs/exampleSSL-com.pem"

# exampleSSL.com (VM 5)

Service
       HeadRequire "Host: exampleSSL.com.*"
       Redirect "https://exampleSSL.com/owncloud/"
       BackEnd
       Address 192.168.1.111
       Port 443 # port 80 works with these settings
       End
Session
       Type IP
       TTL 60000
       End
    End
End

ListenHTTP (VM 1)
          Address 192.168.1.200
          Port 80
          xHTTP 3

# example.com (VM 2)

Service
        HeadRequire "Host: example.com.*"
        BackEnd
                Address 192.168.1.150
                Port 80
        End
 Session
        Type IP
        TTL 60000
     End
   End
End
With this config on port 80 – it worked. But when we changed the port on the Backend to 443, we got served with “Bad Request 400”.
UPDATE 2016-08-09:
Just got an email from one of our readers that said that this configuration worked for him. Thanks Jc Connell!
        Service
                HeadRequire "Host:.*owncloud.example.com.*"
                BackEnd
                        Address 192.0.1.122
                        Port 443
                        HTTPS
                End
        End
the .pem cert
In order to make the PEM cert file work as expected, you have to copy your real cert from the server on to one single file on the Pound proxy. And the order in that PEM file is crucial to make it work.
- Copy your SSL key from the server to the top of the .pem file on the Pound proxy
- Copy your Cert file from the server to the middle of the .pem file on the Pound proxy
- Copy your CA-bundle from the server to the bottom of the .pem file on the Pound proxy
- Save it an refer to it in Cert option below the Listen HTTPS directive.
That’s about it. Feel free to write in the comments if you have any suggestions or questions. :)